Use GoCD for Android and get rid of Jenkins
19 Apr 2016As an Android developer, who does not know Jenkins?
Jenkins is the #1 integration server by far. I have been personally using it for 4 years now, i.e. since I started Android development professionally. But sometimes you have to kill your old habits and try something new!
This article is about Go CD, another continuous integration server, with a different and interesting approach. This is not a wizard but rather a description and feedback about my experiments with its key features on Android.
Context
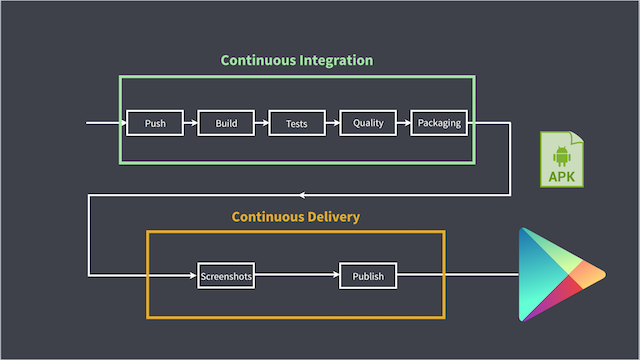
Last month, I gave a talk about continuous delivery on Android and this is my conclusion slide:

I thought a lot about this because I realized that my integration server was not reflecting at all this slide and that it would be interesting to have a more pipeline approach.
Why Go CD ?
Most of the projects I have been working on (and at Captain Train also) needed to be self-hosted. I know there are a lot of great tools like Travis CI, Circle CI or Codeship for instance but there are all PaaS solution.
Go CD was providing the pipeline approach I was looking for:
- Small steps over monolythic script. Indeed, like you are breaking your code into small methods, you should break your pipeline into small steps. Small steps makes it easier to debug and maintain.
- Automation over human process. It permits to avoid human errors. Automate as much as possible, even the smallest task.
- Visualization over supposition. If you can visualize easily and precisely your process, it is far better than any explanation.
Let’s get started with its main principles now.
One server to control them all
Every Go CD setup need one server to control several agents. Basically, an agent can be considered as a worker. When there is work to do, server distributes it to its agents. As you may have guessed, you will need at least one agent and one server to get started.
First installation
Now let’s see how we can use Go CD with Android.
First, I installed a Go Server and a Go Agent. It is pretty straight forward. Every following configuration has to be made on the Go Server since the agent only executes what the server gives it.
To be able to play with Android build system, I had to install an Android SDK for the agent. Since Android uses Gradle, I also had to install a Gradle plugin. All plugins supported and maintained are available on Go CD website.
Finally, you also need to declare your ANDROID_HOME as environment variable that points to your Android SDK. I won’t cover it in this article, but Go CD provides a way to configure environments and its variables easily. You can find more information about this in their documentation.
Value Stream Map
They are several definition around Go CD that must be understood before playing with it. These concepts must be mastered because they are the base of building a great pipeline.
-
Material: It starts a
Pipeline. Most of the time, it will be your Git repository, but it could also be the availability of an artifact or even anotherPipeline. -
Task: It is a command. Task must be as small as possible (as long as it makes sense) in order to have a quick feedback on what was wrong.
-
Job: It consists of several
Taskswhich are sequential, i.e. they are run one after the other. Tasks of the same job are always run on the same agent. -
Stage: It consists of several
Jobswhich are not sequential, i.e. they are run in parallel and potentially by various agents. -
Pipeline: It consists of several
Stageswhich are sequential. It is started by aMaterial.
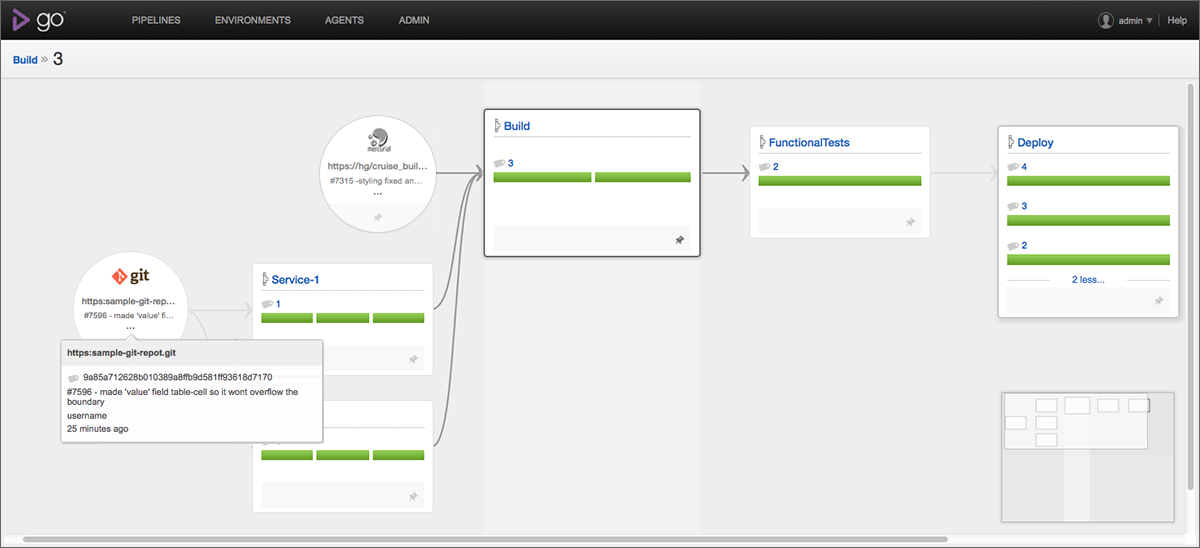
The Value Stream Map is just the representation of a Pipeline. Splitting this Pipeline into small pieces makes it very powerful: quick feedback, speedup and parallelization.

An Android pipeline
AndroidDebug pipeline
The first pipeline consists in building a debug APK triggered by a new commit in the dev Git branch. If you followed me about the Value Stream Map, let’s dive into Stages, Job and Tasks.
- Stage — Compile
- Job — Compile
- Task — Compile with Gradle task
:app:compileDebugSources
- Stage — Tests
- Job — Units
- Task — Unit testing with Gradle task
:app:testDebug - Task - Upload unit tests report to a S3 repository - Job — Integration
- Task — Instrumentation testing: Gradle task
:app:connectedAppTest. Basically, I use the Genymotion Gradle plugin to start a new device, run my tests with Espresso, use Spoon and stop the device. - Task - Upload spoon report to a S3 repository
- Stage — Quality
- Job — Lint
- Task — Lint with Gradle task
:app:lintDebug - Task - Upload lint report to a S3 repository - Job — SonarQube
- Task - Run SonarQube client (analyse and upload to SonarQube server)
- Stage — Assemble
- Job — Assemble
- Task — Assemble debug APK with Gradle task
:app:assembleDebug - Task — Upload debug APK to a S3 repository
We now have the continuous integration pipeline that will be using along our developments.
AndroidRelease pipeline
This second pipeline consists in building the release APK triggered by a new commit in master (merge from dev branch).
- Stage — Assemble
- Job — Assemble
- Task — Assemble release APK with Gradle task
:app:assembleRelease - Task — Run analyse on APK to retrieve statistics
- Task — Upload release APK and statistics to a S3 repository
At this step, we generated the release APK that we can deliver to the Play Store.
Screenshots pipeline
This third pipeline consists in taking screenshots. I chose to make it a new screenshot in order to be able to run it independently that the Play Store delivery. It will be triggered by the last pipeline. Once the release APK is generated, we can start generating screenshots.
- Stage — Screenshots
- Job — Screenshots
- Task — Run the script that takes screenshots of my application
- Task — Run the script that will generate frame screenshots and other assets
- Task — Upload every asset to a S3 repository
Publishing pipeline
This forth and final pipeline aims at delivering to the Play Store our release APK, our listings and our screenshots. This pipeline is triggered by two materials: the last two pipeline results. Basically, we create two materials watching our S3 repository for new screenshots and a new release APK.
- Stage — Publish
- Job — Publish
- Task — Run our publishing scripts that will upload our APK, screenshots and listings
Conclusion
With these pipelines, first we stick to my introduction slide which was my goal. We also have very detailed steps that will allow us easy maintenance and debug. Indeed, new tasks can be added, tried and improved without modifying the whole system. Granularity is everything.
This article is just me experimenting with what I consider to be an alternative to my old Jenkins.
Obviously, we have to be pragmatic and moving out of Jenkins right away would probably be a mistake. Indeed, you must verify that everything you achieve with Jenkins can be reproduced with Go CD. However, you should at least try and see if it can help you delivery faster and better apps.
On my side, I am still playing with Go CD and trying to convince my team is a work-in-progress.
