How we design a beautiful animation
15 Sep 2016Last week, we rebranded Captain Train app to Trainline. It means we had to change our colors, icons, empty states and … animations to match our new brand. Bye bye green and hello navy and mint!
We had some questions about how we created our new loading animation. Therefore I thought that this blogpost could be useful to my fellow developers. Indeed, I will try to explain how we designed and implemented this animation.
Spoiler: it is fully rendered on device: no video, no gif, just plain old view and vector animations.
Context and goal
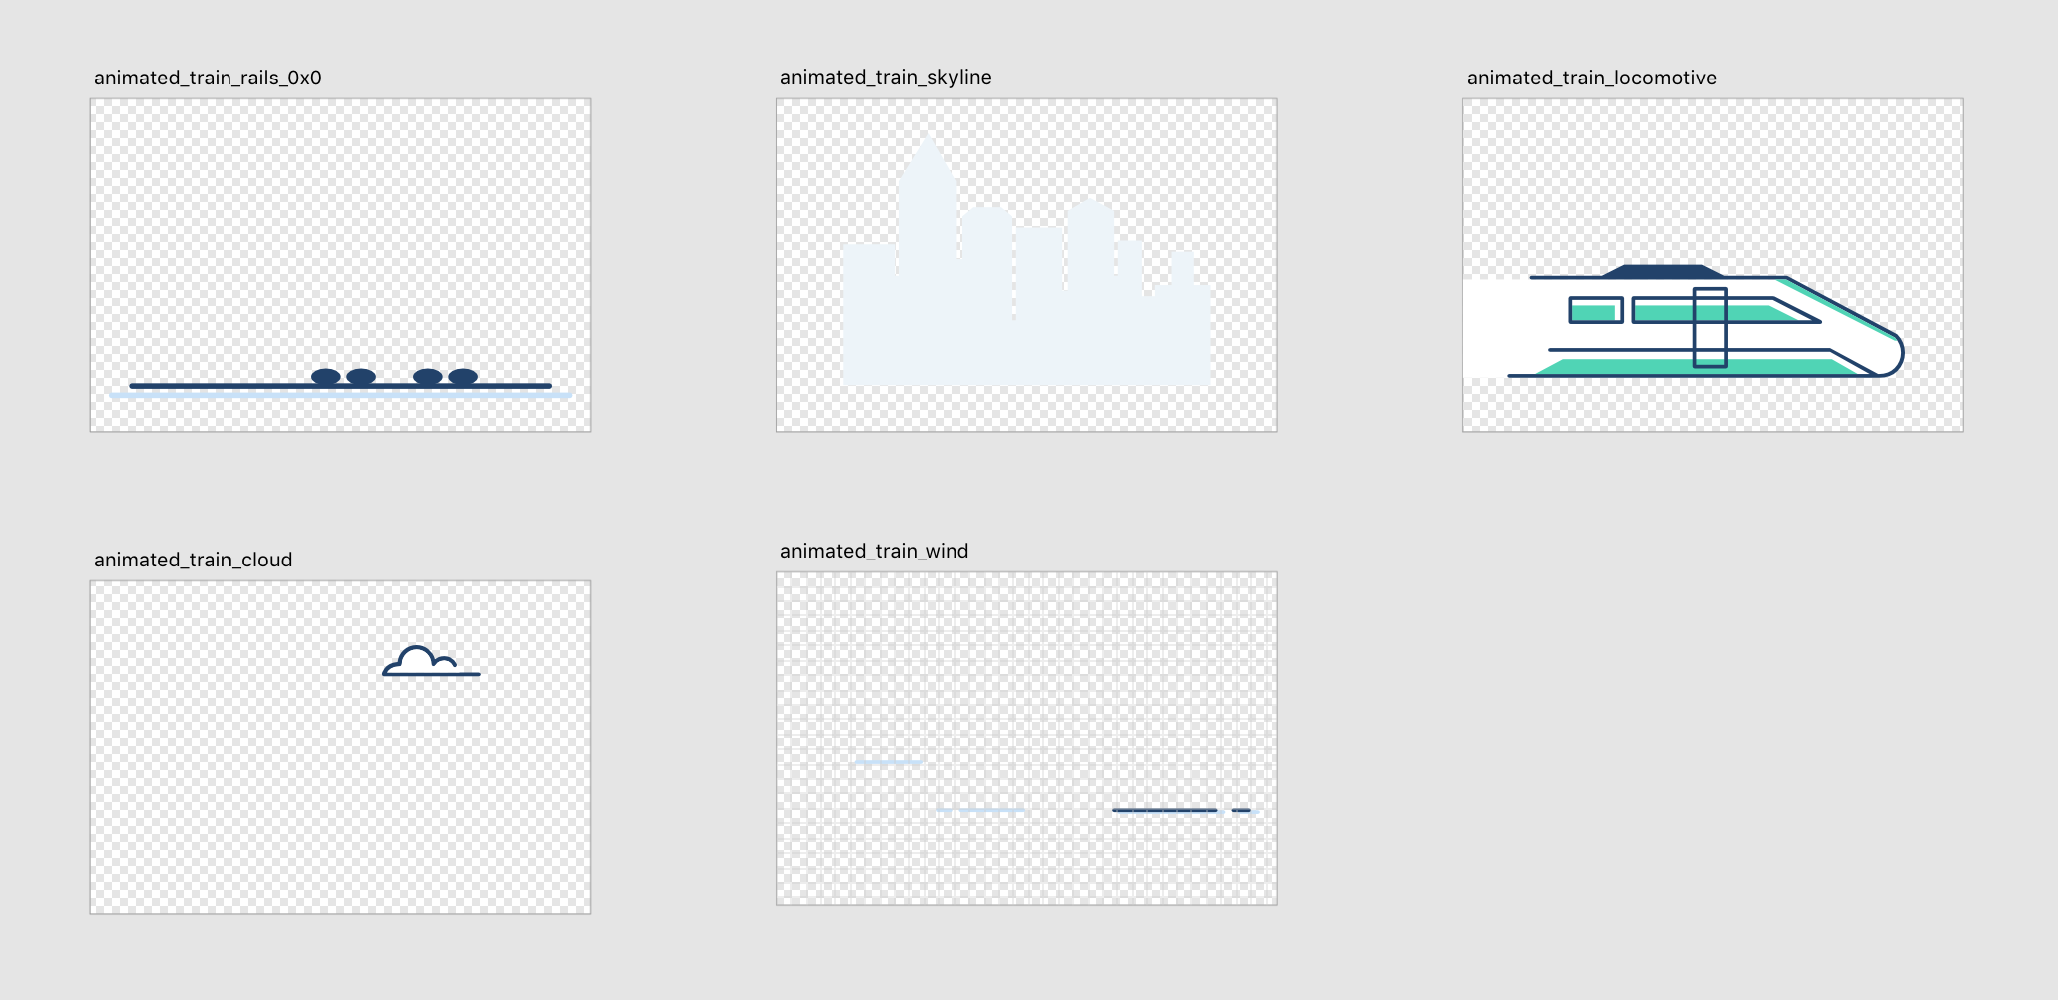
Before the rebranding, we had this animation when loading the search results:
It was very simple and done in less than 3 hours just before releasing the app. Indeed, We just had a animation-list drawable composed of 3 drawables with different position for the rails.
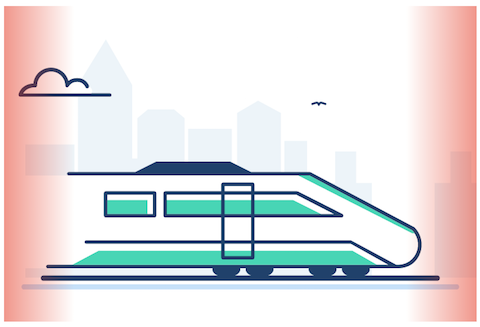
For the app branded as Trainline, we wanted something better. Our designer created a beautiful illustration and our challenge was now to animate it. Let’s start by the end, here is the result we achieved:
Now let’s see how I created it.
Implementation
There are several techniques that can be used on Android to implement animations. First, it’s important to note that I wanted this animation to be available from Ice Cream Sandwich (4.0) which is the minSdk of our application.
Let’s see the various possibilities:
-
Use a GIF. It would be a good solution for web development but GIF is not really supported on Android. I did not want to import a new library just to handle this case. Also, I would have to handle every density which would be really heavy for our APK.
-
Use a video. Well… I did not want to have to play with
MediaPlayand stuff like that. Really. These arguments are also still valid: multiple density and heavy APK. -
Use AnimatedVectorDrawable. Since it was backported lately, this became a solution I looked into. They are really great however it can be really verbose with lots of XML files. It was also difficult for us to streamline the process between designers and developers since AnimatedVectorDrawables are not easily created (nor understood) by designers. Finally, the image had complex shapes and I was not convinced this would be smooth on low end devices.
-
Use view animation. It is an easy process for designers and developers since it just involved standard VectorDrawables as usual. View animations are very well handled by the Android framework and optimized for redraw and performance.
Design
The further, the slower
The first step was to design the parallax animation to give the feeling of speed and movement. I needed to decompose our original image into several layers and display them in ImageViews:
Then, the rule is pretty simple: “The further it is, the slower it moves”. For instance, obviously the wind had to move faster than the skyline.
The principle for animating a layer is also very simple and the same for each layer: I move the layer from right to left. It starts outside the viewport and ends outside the viewport on the other side. It goes in repeat mode infinitely. Finally, further the layer is, greater will be the duration for the animation. Let’s some sample code now:
int translationXStart = totalViewWidth - mLayerView.getLeft() + OFFSET;
int translationXEnd = -mLayerView.getLeft() - mLayerView.getWidth() - OFFSET;

mLayerAnimator = ObjectAnimator.ofFloat(mLayerView,
                                        View.TRANSLATION_X,
                                        translationXStart,
                                        translationXEnd);

mLayerAnimator.setRepeatCount(ObjectAnimator.INFINITE);
mLayerAnimator.setRepeatMode(ObjectAnimator.RESTART);
mLayerAnimator.setInterpolator(LINEAR_INTERPOLATOR);
mLayerAnimator.setDuration(ANIMATION_DURATION);
As you can see, it is very easy. This example just animates the X but for some layers (train and birds), I also had to animate the Y.
Another important detail is that to reduce memory footprint, each layer wraps its content. Therefore, Android will only draw the minimum part that changed.
As you can see the only layer that does not move in the animation are the rails.
Finally, we don’t support RTL at the moment, however if one day we do, it will be very easy to change the direction of the animation.
Magic disappearance
Since the animation repeats itself indefinitely, I had to find a way to make the layer smoothly fade out between two rounds. Indeed, once the bird reaches the left of the image, it has to start again from the right. Here, I used a very small trick: two views with a semi-transparent gradient drawable in background. See this image below to illustrate:
Natural train moves
My first implementation for the train was just to move up and down by 1dp. Good enough ? No. After speaking with our designer, he advised me to try a more natural implementation. Indeed, a train don’t really vibrate this way.
I wanted to create my own interpolator to follow my own path:
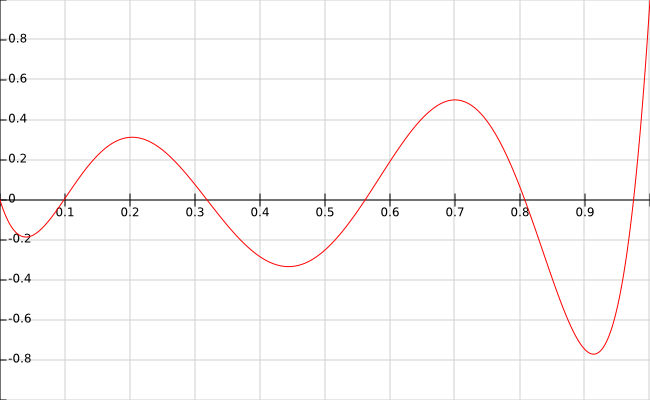
The best way to achieve this, is to use a PathInterpolator. This interpolator is probably the less known among developers but in my opinion it’s the more powerful, especially now that it is backported with PathInterpolatorCompat.
Let’s see some code:
private void prepareLocomotiveAnimation() {

        // First, create your path
        final Path path = new Path();
        path.lineTo(0.25f, 0.25f);
        path.lineTo(0.5f, -0.25f);
        path.lineTo(0.7f, 0.5f);
        path.lineTo(0.9f, -0.75f);
        path.lineTo(1f, 1f);

        // Create the ObjectAnimatpr
        mLocomotiveAnimator = ObjectAnimator.ofFloat(mLocomotiveView,
                                                     View.TRANSLATION_Y,
                                                     -1dp,
                                                     0);

        mLocomotiveAnimator.setRepeatCount(ObjectAnimator.INFINITE);
        mLocomotiveAnimator.setRepeatMode(ObjectAnimator.REVERSE);
        mLocomotiveAnimator.setDuration(ANIMATION_DURATION_LOCOMOTIVE);

        // Use the PathInterpolatorCompat
        mLocomotiveAnimator.setInterpolator(PathInterpolatorCompat.create(path));
}
Indeed, no magic. Please note that I should improve this interpolation by using quadTo instead of lineTo to make it smoother. Also note that we reverse the animation to make it continuous.
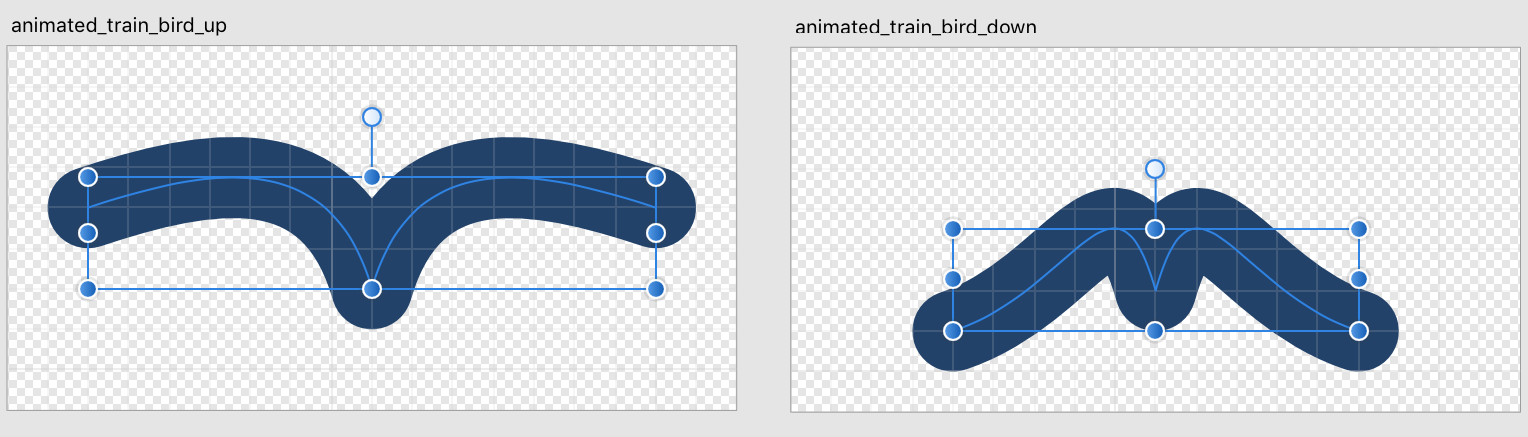
Make the birds fly
This is the cherry on the cake. I wanted to make the birds fly. When explaining your work day to your friends, “I made birds fly” can be very confusing :) But let’s see how I did it.
Well … I said AnimatedVectorDrawables were great right ? So they are the perfect solution for this case. First step is to import your VectorDrawable:
<vector xmlns:android="http://schemas.android.com/apk/res/android"
    android:viewportWidth="18"
    android:viewportHeight="9"
    android:width="18dp"
    android:height="9dp">
    <path
        android:name="bird"
        android:pathData="M2,4c3,-1 6,-1.5 7,2c1,-3.5 4,-3 7,-2"
        android:strokeLineJoin="round"
        android:strokeWidth="2"
        android:strokeColor="#20416b"
        android:strokeMiterLimit="1.41421"
        android:strokeLineCap="round" />
</vector>
The pathData value is the vector when the wings of the bird are up.
Then, you need an animator to make the wings of our bird up and down. The most important part is to have the same amount of point in both path data.
<objectAnimator xmlns:android="http://schemas.android.com/apk/res/android"
    android:duration="500"
    android:interpolator="@android:anim/accelerate_interpolator"
    android:propertyName="pathData"
    android:repeatCount="infinite"
    android:repeatMode="reverse"
    android:valueFrom="M2,4c3,-1 6,-1.5 7,2c1,-3.5 4,-3 7,-2"
    android:valueTo="M4,7c3,-1 4,-4.5 5,-1c1,-3.5 2,0 5,1"
    android:valueType="pathType" />
As you can see in the valueFrom value, this is our vector when the wings are up. The value in valueTo is a new vector with the same amount of point when the wings are down.
Finally you match the VectorDrawable with the animator thanks to the AnimatedVectorDrawable:
<animated-vector xmlns:android="http://schemas.android.com/apk/res/android"
    android:drawable="@drawable/animated_train_bird">
    <target
        android:animation="@animator/fly"
        android:name="bird" />
</animated-vector>
As you can see this could be a basic example to illustrate how AnimatedVectorDrawables are powerful and it really gives a great final touch to this animation.
Conclusion
In conclusion, I would say that the key was feedback! You always need other people to check if what you designed is meaningful, beautiful and natural. Indeed, it’s often a long way in tuning every parameter…
In my case, I could not have done it without Enrico for the beautiful train visual design, Cyril and Thibaut for the feedback and reviews.